파코즈에서 돌아다니다 좋은 정보를 얻었습니다. Windows 7 궁극의 팁 모음 이라는 글로 MSDN에 올라온 Windows 7의 팁을 번역해 두었네요.
원문 : http://blogs.msdn.com/tims/archive/2009/01/12/the-bumper-list-of-windows-7-secrets.aspx
원문에 13번 항목을 보면 빠른실행 영역을 만드는 방법이 나와 있습니다.
|
I Want My Quick Launch Toolbar Back! You might have noticed that the old faithful Quick Launch toolbar is not only disabled by default in Windows 7, it’s actually missing from the list of toolbars. As is probably obvious, the concept of having a set of pinned shortcut icons is now integrated directly into the new taskbar. Based on early user interface testing, we think that the vast majority of users out there (i.e. not the kind of folk who read this blog, with the exception of my mother) will be quite happy with the new model, but if you’re after the retro behavior, you’ll be pleased to know that the old shortcuts are all still there. To re-enable it, do the following:
If it’s not obvious by the semi-tortuous steps above, it’s worth noting that this isn’t something we’re exactly desperate for folks to re-enable, but it’s there if you really need it for some reason. Incidentally, we’d love you to really try the new model first and give us feedback on why you felt the new taskbar didn’t suit your needs. |
영어..군요. 다른건 모르고 가운데 부분의 땡땡이 부분만 따라하면 됩니다.
| 먼저 작업표시줄에서 우클릭을 하여 Toolbars(도구모음) - New Toolbar(새 도구모음)으로 들어갑니다. 창의 폴더 부분에 %userprofile%\AppData\Roaming\Microsoft\Internet Explorer\Quick Launch 를 넣어주고 엔터나 확인을 누릅니다. 작업표시줄에 우클릭을 하고 lock the taskbar(작업표시줄 잠금 해제)를 누릅니다. 빠른실행에 나타난 부분에 우클릭을 하고 Show text(텍스트 표시)와 Show title(제목 표시)를 해제합니다. view(보기)에서 small icons(작은 아이콘)을 선택합니다. 다시 작업표시줄을 우클릭하여 lock the taskbar(작업표시줄 잠금)을 해줍니다. |
이렇게 해주면 빠른실행 영역이 나타납니다. 다만 이전 OS와는 다르게 트레이 아이콘 왼쪽으로 나타납니다.
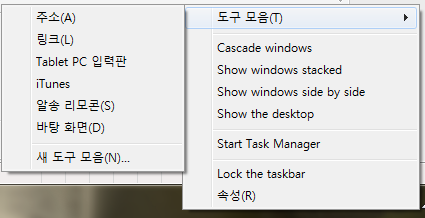
새 도구모음을 누른다.
작업표시줄에서 우클릭- 도구모음 - 새 도구모음으로 들어갑니다.
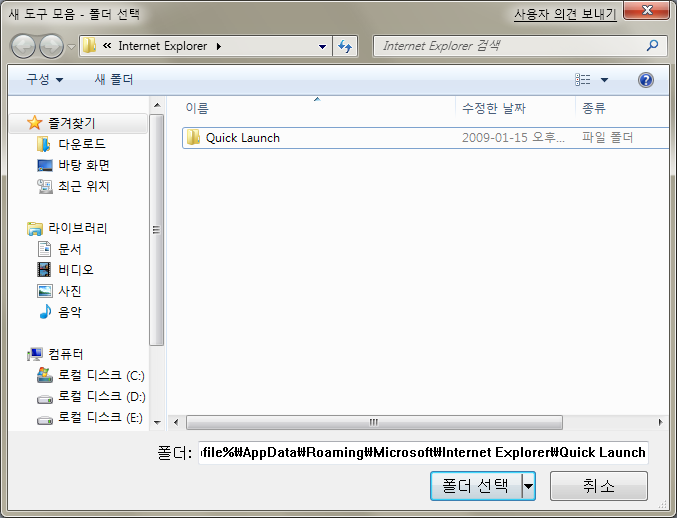
폴더를 선택해줘야 합니다.
위와 같이 창이 나오면 하단에
%userprofile%\AppData\Roaming\Microsoft\Internet Explorer\Quick Launch
을입력합니다.
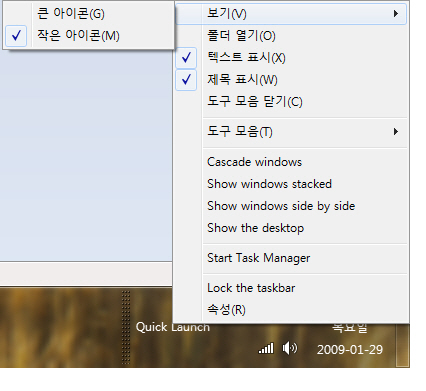
Lock the taskbar를 해제해 주세요.
Lock the Taskbar를 눌러줘서 앞에 체크를 없애야 위와 같이 나옵니다. 그후 텍스트 표시와 제목표시 체크를 해제하고, 보기에서 작은아이콘을 선택해주면 이전 OS처럼 빠른 실행 영역이 나타납니다.
다시 Lock the taskbar를 눌러서 작업표시줄을 잠궈줍니다.
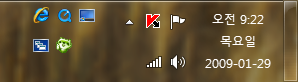
빠른 실행 아이콘
빠른실행을 추가하고 나면 나타납니다. 이전 OS보다 작업표시줄이 완전히 투명해져서 보기가 훨씬 좋습니다. 다만 익숙하던 좌측 빠른실행이 아닌 우측 빠른실행이 되었습니다. 익숙해 지려면 상당히 오랜 시간이 걸릴지도 모르겠습니다.
빠른실행을 이렇게 사용하기 보다는 작업표시줄에 고정(pin)하는게 7에서는 좀더 편한게 아닐까 싶네요.
'컴퓨터 > Software' 카테고리의 다른 글
| Windows 7 관리자 권한 (1) | 2009.02.01 |
|---|---|
| 다운로드 가속 및 Flv, swf, avi 영상 다운로더 - Orbit Downloader (7) | 2009.01.31 |
| Windows 7 드라이버가 잡히지 않을 경우 (1) | 2009.01.29 |
| 알지도 못하는 사이 저작권 파일이 업로드중? (0) | 2009.01.26 |
| Windows 7의 블루투스 (0) | 2009.01.24 |


댓글